Test-Driven Development with Cypress & Testing Library
Personally, my preferred way of working is in a well-thought-out and structured way. As a passionate front-end developer, however, I love to write code right away once any new feature has to be built. The approach of diving right into writing code has more than once caused me to have to go back to the drawing board at a later stage in development. Sometimes I thought I understood the requirements correctly, while other times the requirements weren't actually what had to be built. So it was time to take a step back and think about this way of working, as I felt like these setbacks could be prevented, but how? This is where test-driven development (TDD) came into play. Think before you code, define before you code and be more efficient while you code. In this blog, we're going to have a look at what TDD is, its pros and cons, and how you could apply it using Cypress.
What is Test Driven Development?
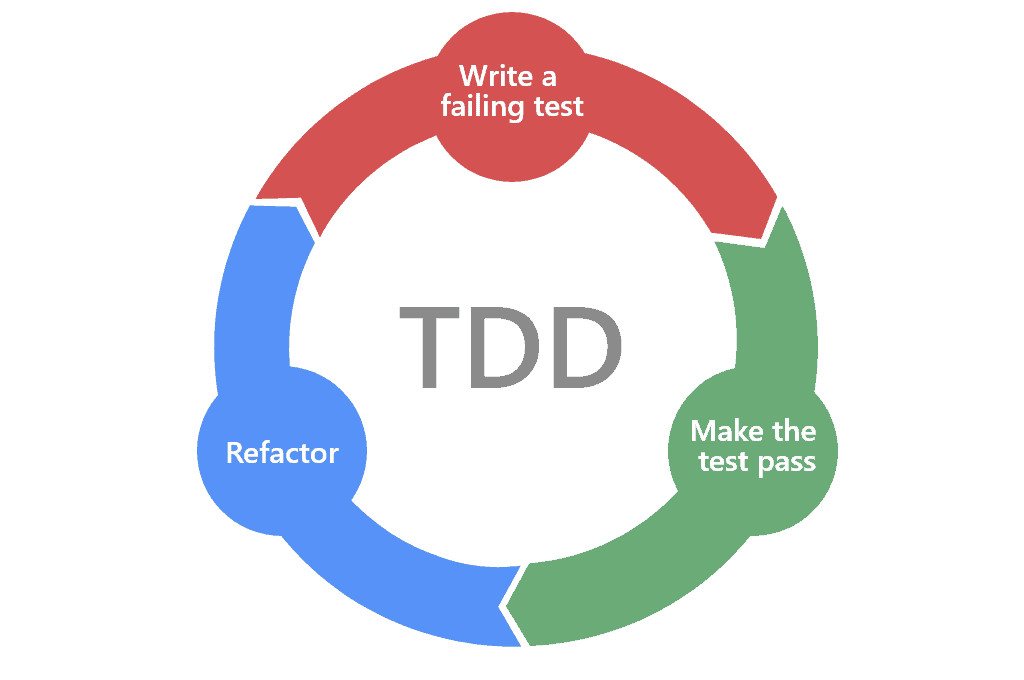
Test-driven development (TDD) is a software development method that defines test cases before the software is fully developed. Using this method, development is done by following a cycle. A popular framework used for TDD is the "Red, Green, Refactor cycle" which helps you to apply TDD in short development cycles. I will briefly go over the cycle here, and dive into the details later on.
So, you start by adding a new test that tests the defined requirements, and you run it. This is the "Red" phase of the cycle, which is always the starting point. It fails, right? It should, as you have not written any code yet. This is just meant to verify your test setup is working as expected and rules out the possibility that the new test is flawed and will always pass. With this "red" test the first phase of the cycle concludes.
You then continue to write the minimally required code for the test to pass, the "Green" phase. It doesn't matter if you have to 'hard-code' some things, as long as the test passes. The code will be revised in a later stage anyway. No code should be added beyond the tested functionality though. Run the test again and it should now pass. If not, revise the code until it does.
The final stage of the cycle, "Refactor", consists of improving the existing implementation of the new code as needed, using tests after each refactor to ensure that functionality is preserved.
Pros and Cons
You may think "that doesn't seem very efficient to me", and I thought that initially as well. Though there are multiple pros to TDD that will add up to make your development process more efficient, structured, and well thought-out.
- TDD forces you into thinking about the requirements before you write any code, resulting in a better understanding of them. As you understand them better, it may also raise questions about them. Hopefully resulting in some healthy discussions.
- With better-defined requirements, you have a better way of defining how the feature should be built. This will ensure the quality of the to-be-written code.
- As you are writing the tests first, you will always end up with a fully tested feature.
- You will catch bugs early on during the development, preventing more of those "ooh, but this seems to be broken" moments just before release.
- Development is done through small incremental steps, preventing large unclear commits with a huge number of changes.
- While focussing on the requirements you can prevent extra, perhaps unnecessary, functionalities from being implemented.
On the other side, there are some drawbacks as well.
- You, and your team, have to commit to it all the way.
- It will take some time to align your new way of working with an existing project. For example, your test coverage may not be sufficient yet and you'll need to make sure all tests are in place first.
- Development of new features may take longer before it's started. However, don't forget that overall development time will become shorter.
- Not everyone may agree and like the way of working, though in my opinion, everyone should at least consider it.
Guide
So now you're probably thinking "Yes this is amazing, show me how it's done!", and so I will. Imagine a simplistic app in which we want to display a list of products. We've set up the web app and configured Cypress to run component tests. Let's start with the first phase in the cycle.
Add a new test
We'll start with writing a test that reflects the defined requirements. In this example they are the following:
- A list of products gets fetched from an API;
- A list of products is shown where each product shows its title, image with a
descriptive
alt-text, and price tag;
Let's have a look at the test I've created for this example and then go over the details.
describe("<ListProducts />", () => {
  let products: ProductList = [];

  beforeEach(() => {
    cy.fixture("products").then((json: { products: ProductList }) => {
      products = json.products;
    });
  });

  it("lists products", () => {
    cy.mount(<ListProducts products={products} />);

    cy.findByRole("list").within(() => {
      cy.findAllByRole("listitem")
        .should("have.length", 30)
        .each(($el, index) => {
          // get the data we want to check
          const { title, description, price, thumbnail } = products[index];

          // item should display the correct title
          cy.wrap($el)
            .findByRole("heading", { level: 2 })
            .should("be.visible")
            .and("have.text", title);

          // item should display the correct thumbnail
          cy.wrap($el)
            .find("img")
            .should("have.attr", "src", thumbnail)
            .and("have.attr", "alt", description);

          // item should display the correct price tag
          cy.wrap($el).findByTestId(`product-${index}-price`).contains(price);
        });
    });
  });
});
You should write your test in a logical order, getting more detailed further
down into the test. For example, the first requirement is fetching data. We can
use Cypress' fixture functionality to mock the fetching and thus always use
the same data when running the test.
Thereafter we'll continue with the next requirement, displaying the list. This
is where we start thinking about which approach we want to take regarding code
setup. In this case, I've chosen to pass the fetched products as a prop to the
<ListProducts /> component. The first assumption we make in the test is that
the component get's mounted correctly.
As we're writing a component test, I prefer to write tests from a user's perspective. What I mean by that is that we look up elements in a way in a user would do. So to start with, for instance, a user would look for a list and thereafter its contents. And that's what we do in our test as well. We start by checking if a list gets rendered. Then, within the list, we want to check if the number of rendered list items equals the number of results.
Now we get to the interesting part, making sure the display of our products
aligns with the requirements. We're again forced into thinking about our code
setup. How are we going to structure the markup of a product? The requirements
state that we need a heading, so we decide that each product's title will be an
h2 element and displays the correct title. The next requirement is the image.
As it's stated the image must have a descriptive alt-text it would be a good
idea to use the description property from the response here. Then, at last,
the price tag of each product must be shown so we end by checking if the correct
price tag gets shown.
We end this first phase in the cycle by running the test.
Failing initial test:
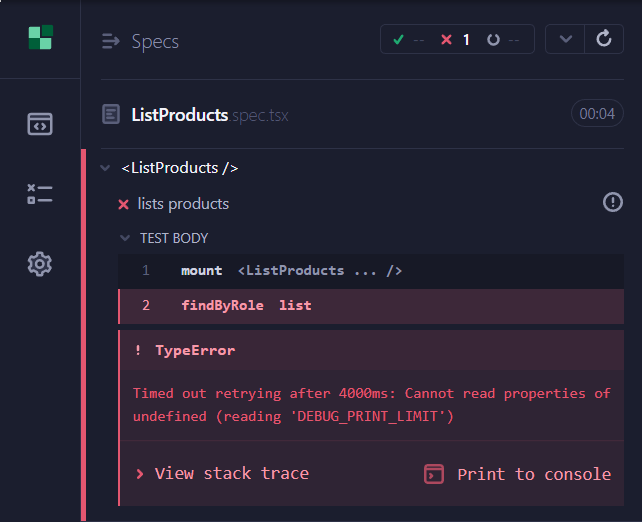
As you would've expected, the test fails as we don't have any code yet. Let's change that! While writing the test we've already made some decisions that we can get started with, so let's continue to the next step.
Write minimally required code for the test to pass
Now that we have our test we have a blueprint available of what our component
should look like, code-wise. In the test, we assume we have a component called
ListProducts. Let's create it and add the minimally required code for the test
to pass. Again, it doesn't have to be pretty and hard coding is okay, as long as
the test passes.
Minimally required code:
const ListProducts = ({ products = [] }: TProps) => (
<ul>
{products.map(({ id, title, description, thumbnail, price }) => (
<li key={`product-${id}`}>
<h2>{title}</h2>
<img alt={description} src={thumbnail} />
<span data-testid={`product-${id}-price`}>&euro; {price}</span>
</li>
))}
</ul>
);
Successful initial test:
We now have a very basic component based on the specifications of the test and a passing test. I know you're thinking "sure, but it isn't pretty though". And that's how it should be. We have already thought about what the component must do, now we can refactor the code as we like in the next phase of the cycle.
Refactor
To make our code more pretty but also maintainable, it could be a good idea to
move the markup of the products in the list to another component, e.g.
<Product />. But before we start coding right away as you might normally do,
we should go over the same cycle as we've already done for the
<ListProducts /> component! The same techniques still apply here, so let's
skip to the result.
Failing refactor test:
Code refactor:
const Product = ({ product }: TProps) => {
const { id, title, description, thumbnail, price } = product;
return (
<li key={`product-${id}`}>
<h2>{title}</h2>
<img alt={description} src={thumbnail} />
<div data-testid={`product-${id}-price`}>&euro; {price}</div>
</li>
);
};
Successful refactor test:
Following the same cycle for the new <Product /> component, we now have a
fully tested new component that we can implement in our <ListProducts />
component. After refactoring our code for the <ListProducts /> component we
should re-run its test to verify it is still rendering as it should. This of
course is one of the major advantages of having this type of test, you make sure
you're refactored code does still apply to requirements!
const ListProducts = ({ products = [] }: TProps) => (
  <ul>
    {products.map((product) => (
      <Product key={product.id} product={product} />
    ))}
  </ul>
);
As you may have noticed is that we are testing the same things in both tests.
The test for the <ListProducts /> component no longer has to test the
contents, as that is already covered in the <Product /> test. Therefore we can
refactor the <ListProducts /> component test to remove the duplicate test
assertions. The cycle is now completed.
describe("<ListProducts />", () => {
  let products: TProductList = [];

  beforeEach(() => {
    cy.fixture("products").then((json: { products: TProductList }) => {
      products = json.products;
    });
  });

  it("lists products", () => {
    cy.mount(<ListProducts products={products} />);

    cy.findByRole("list").findAllByRole("listitem").should("have.length", 30);
  });
});
But what about extending features?
"Okay, but what about extending an existing feature?" you might ask. Well, we
can apply the same cycle here as well! Let's take another example, we need to
display the number of items in stock for each product. Following the cycle, we
extend the <Product /> test.
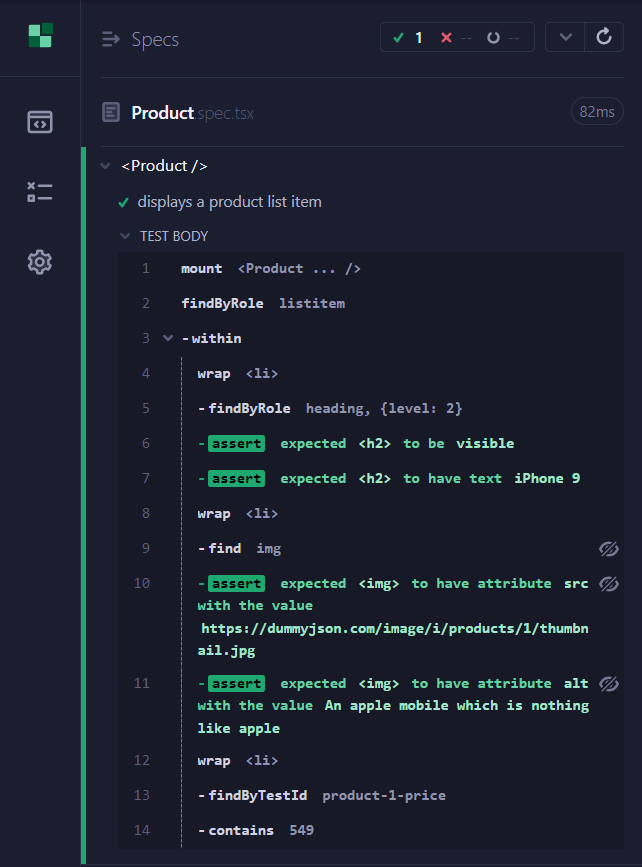
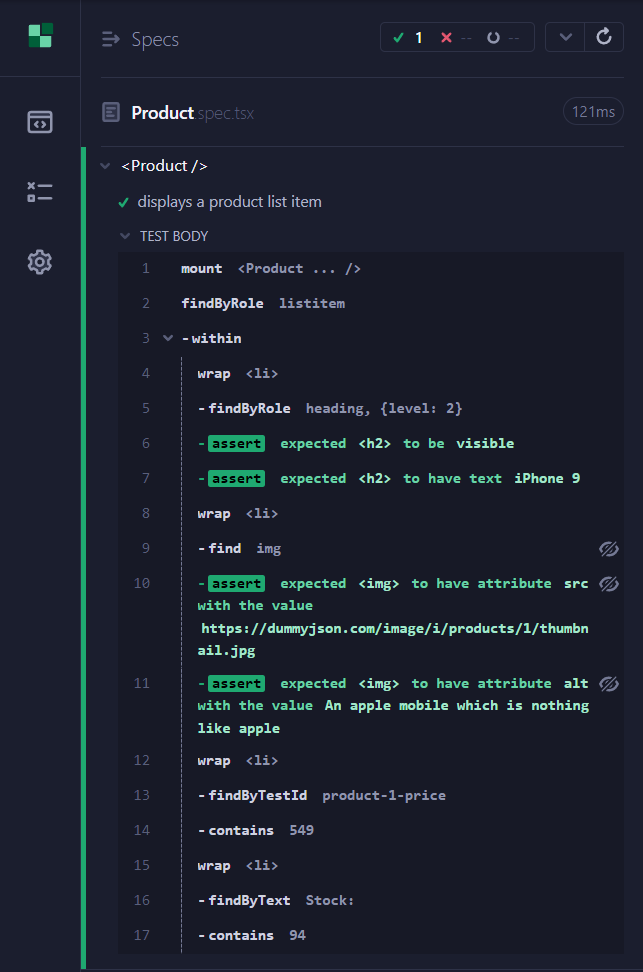
describe("<Product />", () => {
  let product: TProduct;

  beforeEach(() => {
    cy.fixture("products").then((json: { products: TProductList }) => {
      product = json.products[0];
    });
  });

  it("displays a product list item", () => {
    cy.mount(<Product product={product} />);

    cy.findByRole("listitem").within(($el) => {
      // get the data we want to check
      const { id, title, description, price, stock, thumbnail } = product;

      // item should display the correct title
      cy.wrap($el)
        .findByRole("heading", { level: 2 })
        .should("be.visible")
        .and("have.text", title);

      // item should display the correct thumbnail
      cy.wrap($el)
        .find("img")
        .should("have.attr", "src", thumbnail)
        .and("have.attr", "alt", description);

      // item should display the correct price tag
      cy.wrap($el).findByTestId(`product-${id}-price`).contains(price);

      // item should display the correct stock
      cy.wrap($el).findByText("Stock:").contains(stock);
    });
  });
});
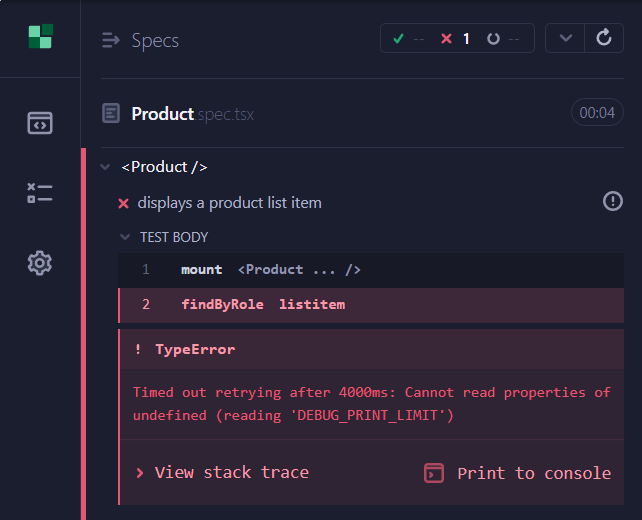
After re-running the test it fails as expected. So now we can continue with extending the component. Re-running the test after making our alterations resulted in a passing test!
Extended component:
const Product = ({ product }: TProps) => {
const { id, title, description, thumbnail, stock, price } = product;
return (
<li key={`product-${id}`}>
<h2>{title}</h2>
<img alt={description} src={thumbnail} />
<div data-testid={`product-${id}-price`}>&euro; {price}</div>
<div>
Stock: <span>{stock}</span>
</div>
</li>
);
};
Successful test after feature extension:
Conclusion
This blog was meant to introduce you to Test-Driven Development and provide you with an example of how to apply it. The TDD methodology requires some effort regarding changes in your and your team's mindset but could be worthwhile. Though in my opinion, it isn't more difficult to apply on an existing project than it is on a newly created project if you're dedicated enough and commit yourself to it. And just like most methodologies, it is open to making it suitable to your situation. In the example given here, we've created component tests, but TDD can also be applied to other types of tests like unit, integration and system tests. Just don't forget that when using TDD the resulting product is not fully tested, so you should still include these other types of tests as well.


 Frameworks at Crossroads Europalaan 93, 3526 KP Utrecht