Slicing Kibana logs with Vue.js
Nowadays we frequently see companies adopting the Elastic Stack to search, analyze and visualize application data in real time. While the scope of application data ingested these days is broadening, it’s already quite common to monitor aggregated application logs in Kibana. Because of this, I frequently find myself coming back to Kibana to slice and filter the logs to monitor how our application deployments progress through deployments. In this blogpost, I’ll outline a small Vue.js web application I wrote to more easily access our application logs.
What we’ll build
A quick screenshot for the impatient. The full source code is available on GitHub.
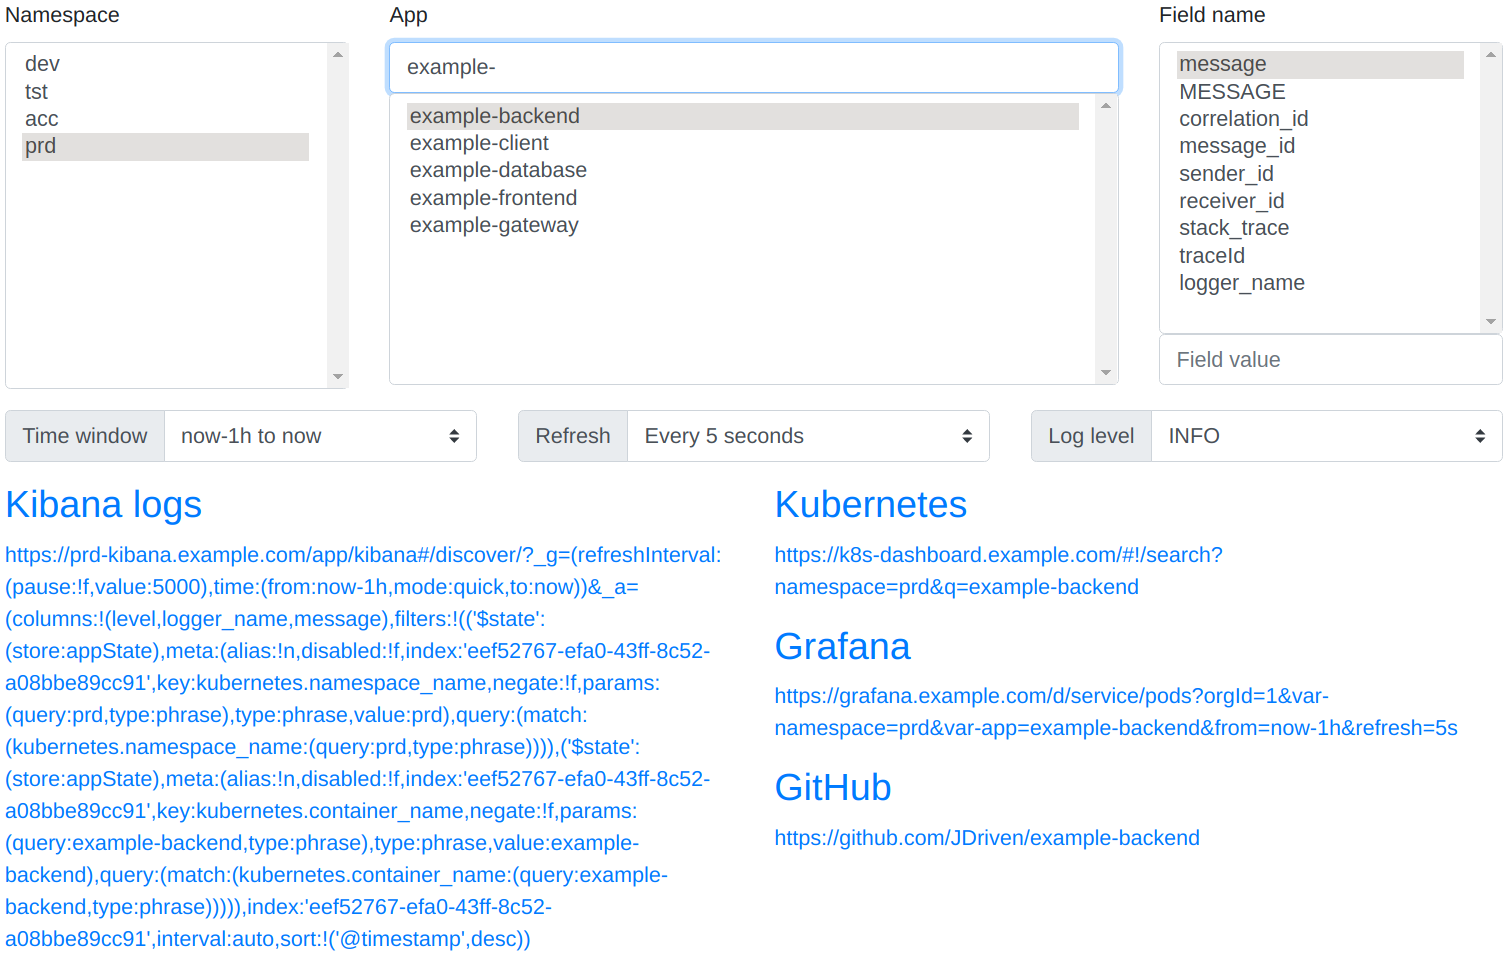
As the look and feel of the application already shows: This is an application built by developers for developers. :)
There are namespace and app selectors at the top, as well as a field value filter. The second row contains a relative time based filter, an auto-refresh toggle and a log level filter. Finally, in blue just below we see the selectors and filters combined to form direct links into Kibana for the relevant logs. We’ll dive into each of these sections below to highlight how they were built with Vue.js.
A bit of background
We run a suite of applications in Kubernetes, which are promoted from one namespace to another as development proceeds. Our application logs are formatted to logstash’s JSON format with Logstash Logback Encoder and captured by Filebeat. This ensures application logs for all deployments are immediately available in Kibana, with filterable fields attributes.
Quick intro to Vue.js
We chose Vue.js for this web application as it’s a fun framework to work in that doesn’t immediately require any scaffolding or complicated build tools. While Vue.js is capable of a whole lot more than shown here, it’s easy to get started and be productive, as it’s designed to be incrementally adoptable.
"At the core of Vue.js is a system that enables us to declaratively render data to the DOM using straightforward template syntax."
If you work your way through the Vue.js documentation essentials you’ll know all you need to follow along. We’ll make extensive use of Computed Properties in particular, to react in response to user selections.
We start out with importing Vue.js, creating a Vue instance, and binding that to an HTML element.
<!DOCTYPE html>
<html lang="en">
  <head>
    <script
      type="text/javascript"
      src="//cdnjs.cloudflare.com/ajax/libs/vue/2.2.1/vue.js"
    ></script>
    <script type="text/javascript">
      //<![CDATA[
      window.onload = function () {
        new Vue({
          el: "#app",
          data: {},
          computed: {},
          watch: {},
        });
      }; //]]>
    </script>
  </head>
  <body>
    <div id="app" class="container"></div>
  </body>
</html>
All further code samples we’ll show either go inside the Vue({ ... })
instance, of within the <div id="app> ... </div>, as can be seen in the full
source code.
Namespace selector
The core of our application consists of selecting a namespace and application,
as these allow you to drill down into the application you’re monitoring quickly,
on the selected environment. Input for these selectors consists of
src/namespaces.json, which lists the Kubernetes namespaces along with their
corresponding Kibana instance details. apps-<namespace>.txt files generated at
build time list the applications deployed per namespace.
We use the
created instance lifecycle hook
to load the namespaces and applications on startup, and store them in our Vue.js
instance data fields.
{
    created: function () {
        // Fetch all namespace apps
        fetch("./namespaces.json")
            .then((data) => data.json())
            .then((result) => {
                this.namespaces = result;
                this.namespaces.map((nmspc) =>
                    fetch("./apps-" + nmspc.name + ".txt")
                        .then((data) => data.text())
                        .then((text) => (nmspc.apps = text.split(/\r?\n/).sort())),
                );
            });
    },
};
The namespaces are then trivially shown as a selector through
a combination of v-model, v-for and v-bind.
<label>Namespace</label>
<select v-model="namespace" size="12">
  <option v-for="option in namespaces" v-bind:value="option">
    {% raw %}{{ option.name }}{% endraw %}
  </option>
</select>
App selector
The applications available for selection depend on the namespace selected. While we could have written code that sets the available options every time a different namespace is selected, Vue.js allows us to take a more declarative approach through the use of computed functions.
{
    computed: {
        apps: function () {
            const options = this.namespace.apps || [];
            return options.filter((it) => it.includes(this.appfilter));
        },
    },
};
Here you see that we define an apps property initialized to the apps loaded
for the selected namespace. Since a namespace can contain a lot of
applications, we allow the user to quickly filter the list through an input
field highlighted in blue in the screenshot above. The resulting list of
applications available for selection is then rendered similar to the namespace
selector.
Watching for edge cases
As users switch between namespace and app selections, we might have to react to their changes. A user might have selected an application already, only to then switch to a namespace which does not contain that application. Or as a user types to filter the applications available, the number of options might drop down to just one. In both these cases we want application to respond naturally to (de)select the appropriate application. This is achieved through the use of two watchers.
{
    watch: {
        apps: function (options) {
            // Autoselect single app option
            if (options.length == 1) {
                this.app = options[0];
            }
        },
        namespace: function (namespace) {
            // Reset app as needed
            if (!namespace.apps.includes(this.app)) {
                this.app = "";
            }
        },
    },
};
While computed functions and watchers look similar on the surface, the documentation goes into depth on when to use which exactly. In short: As computed properties are cached based on their reactive dependencies, they are the preferred way to respond to changes whenever possible.
Field value filters
When troubleshooting it’s most helpful to limit the logs to only those associated with the corresponding request, message or user. For this purpose, we add entries to our Mapped Diagnostic Context that allow us to filter on relevant field values in Kibana. The selection component in the top right corner allows the user to select a field and provide a value, which will be added as a Kibana query in the final composed URL.
const query =
  this.fieldname.length && this.fieldvalue.length
    ? "query:(language:kuery,query:'" + this.fieldname + ":%22" + this.fieldvalue + "%22')," // prettier-ignore
    : "";
The same selectors in a minor way also influence the columns that’ll be shown in Kibana. For the full details on how have a look at the source code.
Log level filter
The remaining filters for time window, refresh interval and log level all work
in the same way. For each we define two Vue.js instance data properties, one
for the current selection, and one for all available options.
{
    data: {
        activeLoglevel: { label: "INFO", value: "20000" },
        loglevels: [
            { label: "INFO", value: "20000" },
            { label: "WARN", value: "30000" },
            { label: "ERROR", value: "40000" },
        ],
    },
};
Notice how we only render the label, but use the full object as selection
value.
<label for="activeLoglevel">Log level</label>
<select id="activeLoglevel" v-model="activeLoglevel">
    <option v-for="option in loglevels" v-bind:value="option">{% raw %}{{ option.label }}{% endraw %}</option>
</select>
Putting it all together
With all selectors bound to data properties, it might by now not come as a
surprise that we compose the full URL within a computed property. Since
computed properties react to any changes in their reactive dependencies, the URL
is updated with every change. Computed properties can even reference other
computed properties, for better composabilty.
{
    computed: {
        kibanaurl: function () {
            const query =
                this.fieldname.length && this.fieldvalue.length
                    ? `query:(language:kuery,query:'${this.fieldname}:"${this.fieldvalue}"'),`
                    : "";
            const time = "from:" + this.timewindow.from + ",mode:quick,to:" + this.timewindow.to;
            const refreshIntervalValue = this.refreshInterval.value ? 'pause:!f,value:5000' : 'pause:!t,value:0';
            return this.namespace.kibanaUrl
                + "?_g=(refreshInterval:(" + refreshIntervalValue + "),time:(" + time + "))"
                + "&_a=(columns:!(" + this.columns + "),"
                + "filters:!(" + this.filters + "),"
                + "index:'" + this.namespace.kibanaIndex + "',"
                + "interval:auto," + query
                + "sort:!('@timestamp',desc))";
        },
    },
};
Finally, we use
Conditional Rendering with v-if
to only render the full URL when a number of condition are met. This ensures the
user only ever sees a valid URL given the present selections.
<div v-if="namespace.name && (app.length || fieldvalue.length || loglevel.label != 'INFO')">
<a v-bind:href="kibanaurl" target="_blank">
<h3>Kibana logs</h3>
<p>{% raw %}{{kibanaurl}}{% endraw %}</p>
</a>
</div>
In the end we have an application that runs fully within the browser, can be deployed anywhere and does not need any build tools like NPM. The full source code is available on GitHub.


 Frameworks at Crossroads Europalaan 93, 3526 KP Utrecht