Installing Jest in an Angular project
Introduction
When starting a new Angular project using the Angular CLI, the app comes with an installation of Karma and Jasmine for your unit and integration tests. Recently, a new star appears on the horizon of the world of testing, in the shape of Jest. Jest is well-known by React-developers but is also gaining ground in the Angular community.
When installing Storybook recently in an existing Ionic/Angular project, I followed some instructions which also described the installation of Jest. Unfortunately, the instructions were already outdated and I needed to do some searching on the net to get my setup right. I hope the following article will help you to get started somewhat faster than I did.
Testrunner vs testframework
Now I don't mean to hook in to the discussion which one is best, Karma or Jest, but I would like to point out that Jest is not a one-to-one replacement of Karma. While Karma is basically a testrunner, Jest presents itself as a universal testing framework for JavaScript and in fact replaces both Karma and Jasmine.
When migrating to Jest, existing testcode can break in some respects (a subject I'll address later in this article) but it doesn't require you to rewrite everything from scratch. In fact, Jest has incorporated a number of features of Jasmine, which make it relatively easy to convert your existing testing codebase to Jest.
Ionic
Although I've used an Ionic/Angular application for this article, the instructions should work for each project generated with Angular CLI. There is one reason though why I wanted to use an Ionic/Angular application: one of the test files autogenerated by Ionic caused me a problem with importing some packages. This may occur in other situations as well, like when you're using particular third-party packages.
Installation
The presumption I have made is that you have a running Ionic/Angular or an Angular project, CLI-generated, with Karma as testrunner and Jasmine as a testing framework.
First step is to install Jest for Angular:
npm install -D jest @types/jest jest-preset-angular
Jest is build in Node.js. For Jest to work in a TypeScript project we need some additional settings on top of the default Babel installation. We need two extra plugins to get this working:
npm install -D @babel/preset-env @babel/preset-typescript
Next, add a file to the root of your project with the name babel.config.js with the following contents:
//babel.config.js
module.exports = function (api) {
  process.env.NODE_ENV === "development" ? api.cache(false) : api.cache(true);
  const presets = [
    [
      "@babel/preset-env",
      {
        targets: {
          node: "current",
        },
      },
    ],
    "@babel/preset-typescript",
  ];
  const plugins = [];
  return {
    presets,
    plugins,
  };
};
Also, we need to make Jest use the Angular plugin and we will need to import it somewhere. A good way to do this is to create a directory and place a config file here. I'll call this directory jest-config use the name setup.ts for the file. all it needs for this moment is the import of jest-preset-angular:
//src/jest-config/setup.ts

import "jest-preset-angular";
Config in package.json
Next create an entry in the package.json file where we’ll put some more configuration. If you’ve worked with other test runners and/or frameworks, you’ll recognize settings such as ignore patterns for files and directories we do not need tested, paths to configurations files and instructions for Babel where to find ts-configs.
"jest": {
  "preset": "jest-preset-angular",
  "setupFilesAfterEnv": [
    "<rootDir>/src/jest-config/setup.ts"
  ],
  "testPathIgnorePatterns": [
    "<rootDir>/node_modules/",
    "<rootDir>/dist/"
  ],
  "coveragePathIgnorePatterns": [
    "/jest-config/",
    "/node_modules/"
  ],
"transform": {
  "^.+\\.(ts|html)$": "ts-jest",
  "^.+\\.js$": "babel-jest"
},
  "transformIgnorePatterns": [
    "<rootDir>/node_modules/(?!(@ionic-native|ionic-native)/)"
  ],
  "moduleFileExtensions": [
    "ts",
    "tsx",
    "js",
    "jsx",
    "json",
    "node",
    ".html"
  ]
}
There are two things to pay attention to in these settings. First, the setting “setupFilesAfterEnv” points Jest to the config file we just created.
The second is the “transformIgnorePatterns” setting. When running tests with Jest, you may stumble across an error like the following:
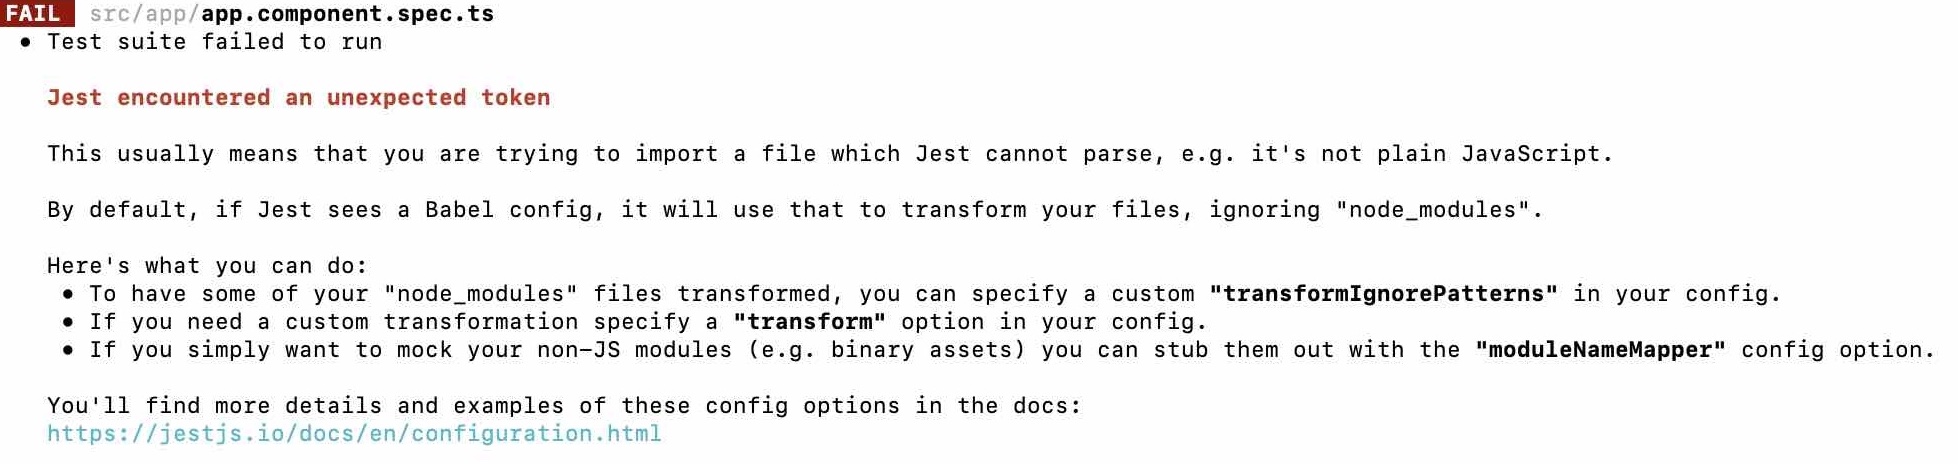
In my Ionic/Angular project this error popped up when importing particular Ionic Native modules such as Splashscreen. Adding 'ionic-native' to this setting solved this issue. Importing other third party packages may throw the same error, which can be fixed similar.
Package.json or setup-ts
Why not use our file jest.config/setup.ts for the Jest settings we just placed in package.json? Well it is possible. As a matter of fact, Jest comes with a CLI and can initiate a config file for you. In this basic tutorial the Jest CLI is out of scope, I would just like you to know it exists.
I personally prefer to leave the standard Jest-options in package.json while reserving the jest-config/setup.ts file for stuff like global mock definitions. Remember that if you place your config in a config file, the configuration needs to be JSON-serializable.
ts-config
Are we ready to give it a try? Not yet, we need some extra settings in our ts-config.spec.json to get things working. First add Jest to the types array under compilerOptions. If there’s no types-array yet, then add one. If you happen to have ‘jasmine’ as a type in this array, remove it so Angular will pick up the right types.
Next, we need to tell TypeScript to allow JavaScript files and set module system to commonjs. Make sure to set "esModuleInterop" to true.
//ts.config.spec.json
{
  "extends": "./tsconfig.json",
  "compilerOptions": {
    "outDir": "./out-tsc/spec",
    "types": ["jest"],
    "module": "commonjs",
    "allowJs": true
  },
  "esModuleInterop": true,
  "files": ["src/polyfills.ts"],
  "include": ["src/**/*.spec.ts", "src/**/*.d.ts"]
}
Now we’re done with a basic setup of Jest. There's one last step to finish this story and that is to remove Karma and Jasmine from your project. You can uninstall all Karma- and Jasmine-packages, remove karma.config.js and the default test.ts file under /src. To finish, remove the reference to test.ts from tsconfig.spec.json.
npm test
This should do the trick, go and try to see if it works. In the scripts entry in package.json you can add /replace the following entry:
    "test": "jest",
    "jest": "jest --watch"
Do your tests run nicely? Well, in my case, they didn't. In the Ionic project I used for this article, a basic project with just one homepage, the default test for the home component succeeded but the ones in app.component.spec.ts failed. This file contains a few Jasmine mocks which need to be replaced. That might be a bit of a set-back if you're migrating a large codebase and you have used these mocks extensively. In my case, it's just one file so let's go ahead and fix this.
This is the original code:
beforeEach(async(() => {
  statusBarSpy = jasmine.createSpyObj("StatusBar", ["styleDefault"]);
  splashScreenSpy = jasmine.createSpyObj("SplashScreen", ["hide"]);
  platformReadySpy = Promise.resolve();
  platformSpy = jasmine.createSpyObj("Platform", { ready: platformReadySpy });

  TestBed.configureTestingModule({
    declarations: [AppComponent],
    schemas: [CUSTOM_ELEMENTS_SCHEMA],
    providers: [
      { provide: StatusBar, useValue: statusBarSpy },
      { provide: SplashScreen, useValue: splashScreenSpy },
      { provide: Platform, useValue: platformSpy },
    ],
  }).compileComponents();
}));
This is my replacement:
//src/app/app.component.spec.ts
beforeEach(async(() => {
  statusBarSpy = { styleDefault: jest.fn() };
  splashScreenSpy = { hide: jest.fn() };

  platformReadySpy = Promise.resolve();
  platformSpy = { ready: jest.fn(() => platformReadySpy) };

  TestBed.configureTestingModule({
    declarations: [AppComponent],
    schemas: [CUSTOM_ELEMENTS_SCHEMA],
    providers: [
      { provide: StatusBar, useValue: statusBarSpy },
      { provide: SplashScreen, useValue: splashScreenSpy },
      { provide: Platform, useValue: platformSpy },
    ],
  }).compileComponents();
}));
Still no success: my test failed with the message "Can't resolve all parameters for AppComponent". The dependencies declared for AppComponent don't seem to come through, even though I provided it with mocks. To set this right, I needed to add this line to ts-config.spec.json under "compilerOptions":
//ts-config.spec.json
"emitDecoratorMetadata": true
Now your tests should be running.
Conclusion
The main gotcha in replacing Karma with Jest is in the fact that Jest, as a Node.js application, requires some additional settings to make imports work and that Jasmine functionality like mocks need replacement. Also, we need to make sure the right typings are found by Angular.
The purpose of this tutorial is just to get Jest installed. With what I describe here you should be able to run your unit tests, but I hope that's just the beginning. Jest is a rich framework, offering things like snapshot testing and integrations that enable you to run browser tests. Go ahead and discover!


 Frameworks at Crossroads Europalaan 93, 3526 KP Utrecht