Advanced Firebase Hosting features
In a previous blog post we covered how to host a static website on Firebase Hosting. In this post we’ll demonstrate and illustrate some of the more advanced futures of FireBase Hosting. In a future blog post we’ll describe how to combine this knowledge with a CI Pipeline to fully automate deployment to production combined with a test and staging environment.
Using multiple environments for one project
After the previous blog post we are able to deploy our website to Firebase Hosting using a single command on our local machine. That’s great but it feels like living a little too much on the edge. To create more comfort we’ll introduce a test and staging environment for our application. After that we’ll show you how to use a CI Pipeline to automatically deploy to these environments in a future blog post.
First we have to create the Firebase projects for our test and staging environment. Please follow the steps in the previous blog post and create two new projects using the postfix -test and -staging. For instance:
- example-project-test
- example-project-staging
Verify that the projects are available using the following command:
npx firebase projects:list
expected output:
┌────────────────────────────┬──────────────────────────────────────┬──────────────────────┐
│ Project Display Name       │ Project ID                           │ Resource Location ID │
├────────────────────────────┼──────────────────────────────────────┼──────────────────────┤
│ example-project-staging    │ example-project-staging              │ [Not specified]      │
├────────────────────────────┼──────────────────────────────────────┼──────────────────────┤
│ example-project-test       │ example-project-test                 │ [Not specified]      │
├────────────────────────────┼──────────────────────────────────────┼──────────────────────┤
│ example-project-production │ example-project-production (current) │ [Not specified]      │
└────────────────────────────┴──────────────────────────────────────┴──────────────────────┘
Firebase supports aliases for projects. We’ll use this aliases to improve the naming of our projects and to prevent us from typing the full project names.
Run the command below three times and create the aliases for production, staging and test by selecting the right project and specifying the name of the alias.
npx firebase use --add
For our test alias this would be the expected output:
```bash ? Which project do you want to add? example-project-test ? What alias do you want to use for this project? (e.g. staging) test
Created alias test for example-project-test. Now using alias test (example-project-test) ```
Verify the result by executing the following command:
npx firebase use
expected output:
  default (example-project-production)
  production (example-project-production)
  staging (example-project-staging)
* test (example-project-test)
You might notice that our default project still points to production. For safety reasons change it to our test environment by running the command below, selecting the test project and specifying default as alias:
npx firebase use --add
Now we’re able to switch environments using the aliases in the
firebase use command. Let’s switch to default:
npx firebase use default
Verify the result by running the following command:
npx firebase use
expected output:
```bash Active Project: default (example-project-test)
Project aliases for .../example-project:
- default (example-project-test) production (example-project-production) staging (example-project-staging)
- test (example-project-test)
Run firebase use --add to define a new project alias. ```
From now on all Firebase CLI commands we run will be executed against our test environment. Optionally you can specify the environment for a single command by using the -P flag and passing the right alias. We can use this to specify to which environment we want to deploy.
npx firebase deploy --only hosting -P staging
**Note:**The information about aliases is stored in the .firebaserc file.
Verify these changes by comparing it with the code block below:
{
  "projects": {
    "default": "example-project-test",
    "production": "example-project-production",
    "staging": "example-project-staging",
    "test": "example-project-test"
  }
}
This configuration should be part of our project so we commit the changes to git using the following commands:
git add .firebaserc
git commit -m "Added environments as aliases"
Connect your own domain
At this moment our applications are accessible using a Firebase Hosting url. The next step is attaching our own (sub)domains to Firebase Hosting. As an additional benefit Firebase will serve your application using a valid Let’s Encrypt certificate.
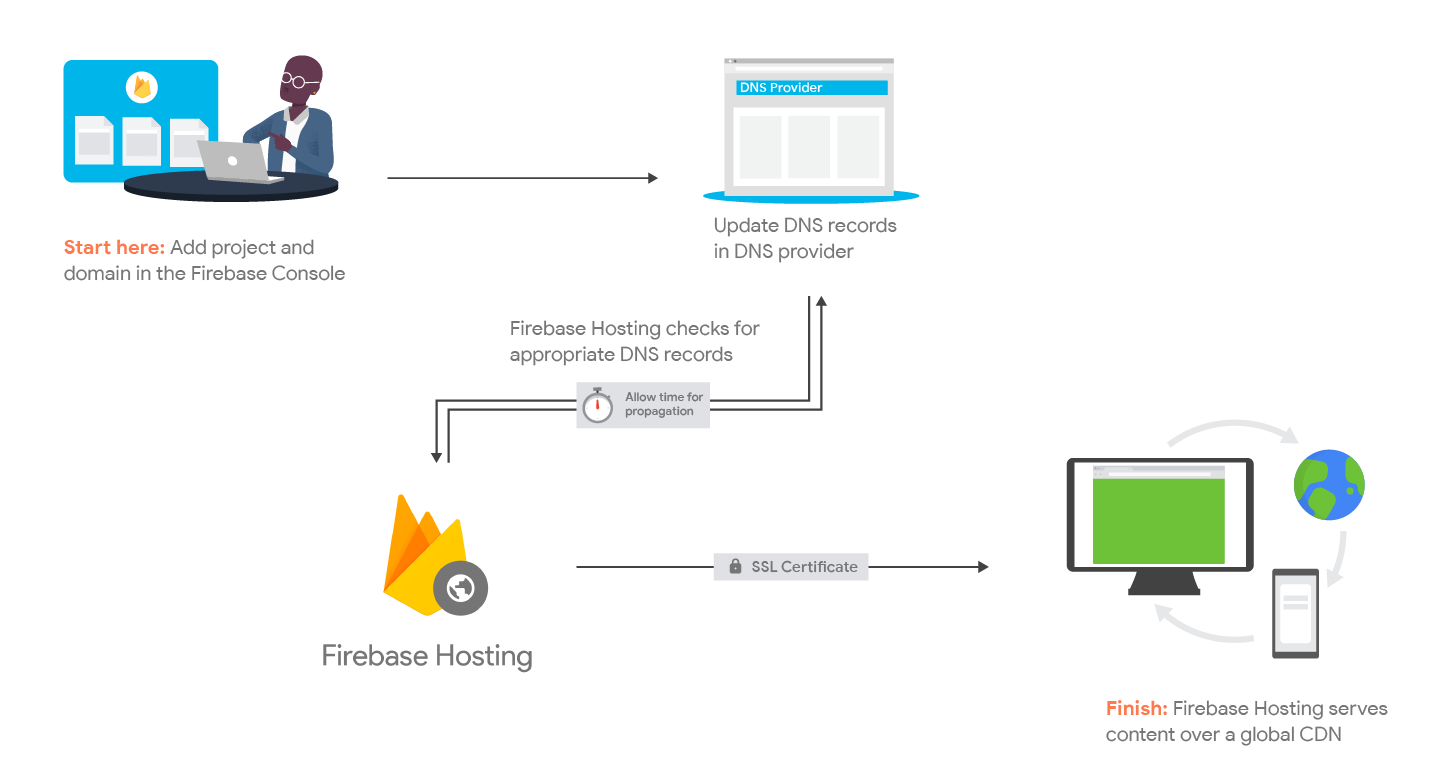
Clear step by step instructions can be found in the Firebase Hosting documentation: https://firebase.google.com/docs/hosting/custom-domain
Configure HTTP Headers to improve caching
You might have noticed that the build process includes hashes in the filenames for most static resources:
dist/css/app.e2713bb0.css
dist/img/logo.82b9c7a5.png
dist/js/app.12166131.js
dist/js/chunk-vendors.e503fe7c.js
This means that as soon as we change something in our project source the
resulting filename after changes. Because of this it is possible to instruct the
client to cache these files for a very long period of time using the
Cache-Control header.
Per default Firebase Hosting adds a Cache-Control: max-age=3600 header to each
response. This instructs the client to cache the response for at most one hour.
To improve our performance we’ll change this header for our hashed resources.
Firebase Hosting allows you to configure the headers that are part of the
response using headers part of the firebase.json file. In the example blow
we change the value of the Cache-Control header to max-age=31557600. This
will instruct the client to cache our resources for at most a year.
{
  "headers": [
    {
      "source": "**.@(js|css)",
      "headers": [
        {
          "key": "Cache-Control",
          "value": "max-age=31557600"
        }
      ]
    },
    {
      "source": "**.@(jpg|jpeg|gif|png|svg)",
      "headers": [
        {
          "key": "Cache-Control",
          "value": "max-age=31557600"
        }
      ]
    }
}
You can also use the headers configuration to set other headers for instance CORS headers.
Use additional Firebase Hosting features
There are many additional Firebase Hosting features you can configure, like:
- Specifying your own 404 page.
- Configuring redirects our rewrites.
- Rewriting urls to Firebase Functions.
- Create cleaner urls using the cleanUrls or trailingSlash options.
More information about these features can be found here: https://firebase.google.com/docs/hosting/full-config
A full version of the firebase.json configuration can be found within the
example project on
Bitbucket:
https://bitbucket.org/divotion/firebase-hosting-example/src/master/firebase.json


 Frameworks at Crossroads Europalaan 93, 3526 KP Utrecht